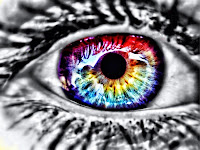
 In this short tutorial i would like to show you how to create such a photo using only your iPhone or iPad, a few apps and the Olloclip with its Macro lens. It is actually pretty simple and can be done within 5 minutes. But as always, the more time you invest, the better it gets. I will also cover a part of how to enhance pictures of an eye, so if you want to go for that, this tutorial could also be a help for you.
So let's start off with what you will need to achieve this effect:
- Olloclip (while not necessary, i strongly recommend it)
- Snapseed, Perfect Image, Camera+
- Someone with a beautiful blue/green eye
Step 1:
Start off by mounting the macro lens of your Olloclip on your iPhone and take a few pictures of the eye. Try to make more than one, because even though the result might look good on the first glance, it can be blurry if you look at it closer. The field of focus of the Macro lens is very small, thats why you will have to keep your iPhone very steady and make sure the eye is actually focused well.
Step 2:
Choose your best shot and open it up in Snapseed. Now its time to enhance your picture how you want it. Personally, i always go for saturation, contrast and white balance (in this case i went for blue). Finally i used Drama, which in my opinion works fantastic for this. If you want you can also stop here, since the result looks already impressive.
Step 3:
At this point the make-up started bothering me, which is why i am going to use the tilt-shift effect. I know this effect isnt meant to do that, but Mac Gyver never cared about that either. Here a quick screenshot how i used the effect. Not sure if you can see it well, but i used the elliptic form.
 |
| I know the result isnt perfect, but i got what i wanted. The make-up is more blurry and less intense. |
Step 4:
Now comes the fun part with the colors. Again, its very simple and done within a minute. Open the photo from "Step 3" with Camera+ and use Clarity. Then go to the filter section and select "Purple Haze". The eye should now look like this. The only problem i had with this picture is that the rest of the eye also got saturated and what not. With our next last step i will show you how we can remove this.
Step 5:
Now its time to desaturate the picture where we need it. Open your photo in Perfect Image (or any other app that lets you desaturate parts of a picture), and just start "drawing" with your finger or stylus over the parts you want to be black and white.
If you are done with that, you can now use again Snapseed to enhance it if you want to.


looks great, gotta try it! :D
ReplyDeletewow cool!
ReplyDelete